Choosing a road trip planner can be difficult. Google My Maps is free and makes it easy to map numerous road trip routes, determine the distance and travel time between each location, and categorize your stops.
I will be sharing how I personally used Google My Maps to plan my week-long family road trip from Chandler, AZ to Kelso, Washington.
You will see step-by-step how to plan, organize, and map your trip, as well as how to navigate Google My Maps to accomplish all of this!
Why Use Google My Maps?
There are several road trip planners you could use. RoadTripper and Roadie are actually two apps that I initially downloaded in preparation for our family vacation. I was excited to use them at first, but soon realized that it would cost money for the apps to be truly useful for me. We unfortunately do not have the means to spare money for planning our trip considering how much gas, motels, activities, and food costs, so I began to look for other options. I am so glad that I heard of Google My Maps through a Reddit thread! I began exploring it immediately and am not disappointed.
Things to Consider
Google My Maps fits the bill for me and I will probably use it for every trip in the future, however there are some reasons why you might consider using something else instead.
Google My Maps will not suggest locations for you. Some road trip apps will suggest locations you may want to stop by. When using Google My Maps, you will have to discover them on your own. This did not bother me because you can easily look at the map and see what towns you will be driving through. Then you can search for places of interest in each town.
Google My Maps is easier to use on a desktop/laptop than a smartphone. Google My Maps is a website rather than an app, and is easier to use on a computer. I have made modifications to my map using my phone’s browser, and it is definitely possible, however it is much easier on a computer. Once your map is created, you will easily be able to access and use your map on your phone for your trip.
Phone applications are more intuitive than Google My Maps. Road trip planning apps will typically walk you through the process of creating your road trip map and ask you questions to make it customized for you and the people traveling with you. Google My Maps is very DIY (which I love!). It will just take a bit of learning, but will come easily once you get an idea of how to use it!
You need a Google account. As you work on your map, it will be saved to your Google Drive. It would also make it easier for you to access your map if you have the Google Maps App for navigation and are logged into it with the same account that you will be making your map with.
Google My Maps isn’t for everyone, but I personally enjoy using it, and I think many of you will too!
What Should You Do Before You Begin?
Before you start using any road trip planner to plan your trip, I’ve found it useful to brainstorm what you want your trip to look like. A few things to consider are:
- Where am I starting?
- Where am I ending?
- How long do I want to drive between each stop?
- Do I want to stop for food?
- How long do I want to drive before I get to a hotel/motel/holiday-inn?
- What time do I want to arrive at each stop?
- How much money can I spend on our trip?
- How long could my kids sit in the car before everyone loses their mind?
I know these questions are important first-hand because my husband and I braved a 7 day trip in our Ford Escape with our 4 year old and 1 year old.
We knew that we wanted to stop at family friendly places, explore cute towns, and that a lot of our stops should be parks because we didn’t want to spend too much money. We also wanted to stop at least every 2-4 hours, for the kids to stretch their legs, and arrive at the motels at a decent time.
Once you have an idea of what you want your trip to look like, you can start using a road trip planner. It’s time to get introduced to Google My Maps!
Making Your Map
You will need a Google account and know how to access Google Drive.
1. Getting Started
Create your map.
Go to google.com/mymaps and click “Create A New Map”.

Name your map.
At this point you can name your map by clicking “Untitled map”. I changed mine to “Road Trip”. You can also add a description.
Name your layer.
Click “untitled layer” and change the name. I changed mine to “locations”.
You should see a section with a check-marked box labeled “untitled layer”. Google My Maps has something called “layers”, and each layer has a job. A layer could either be used to hold locations or hold driving routes, not both. It will make more sense as we go on!

2. Adding Locations
Click the “add marker” symbol underneath the search bar. Enter a location into your search bar. The location should populate on the map.
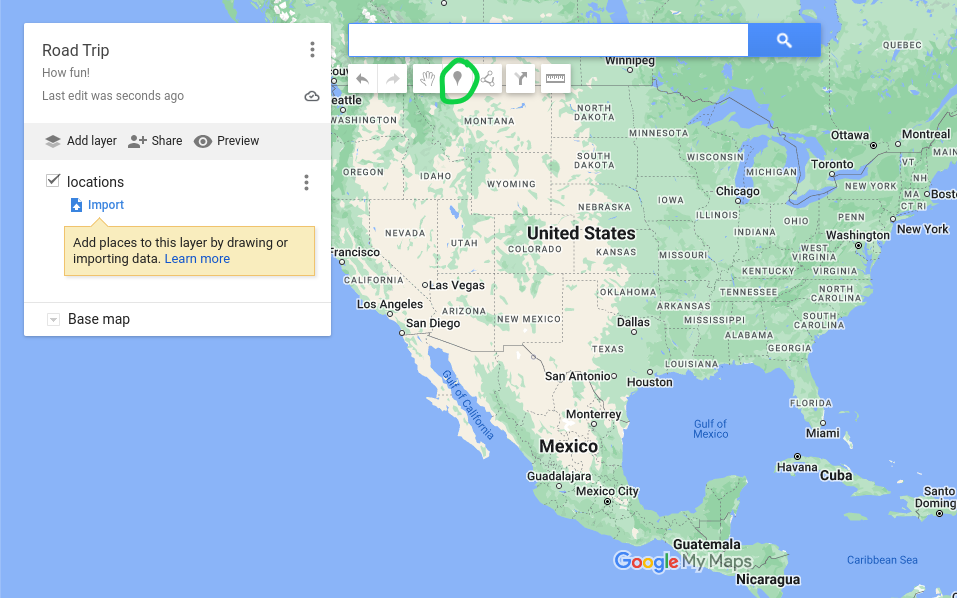

From here, select your location by clicking on the location icon on the map. Click “Add to map”. You will see it populate in your layer designated for locations.

If you already know where you want to spend the night along the trip, I would start with mapping those first, then add any other cool/important places for you to go. If you have no idea where you want to stop on your trip, continue to the next step and you can figure this out later.
In my example, I am adding only my starting point and ending point for now.

3. Adding Driving Routes
Create a route.
Select the “draw a line” icon beneath the search bar, then click “Add driving route”.

Click on the two locations you would like to connect.
This will create a new layer designated for driving routes only. I am connecting Chandler, AZ and Kelso, WA. I will add my pit-stops later.

Discover more locations.
If you’d like to discover more places to visit, you can look at the route Google has picked for you, and see what towns you will be driving through. Do some research to see if there are any places of interest in each town using Google or social media! You can then add those locations to your map. I’ve added “Red Rock Canyon” and “Smith Rock State Park” to my map as an example.

Add your pit-stops.
To add more locations to your route, go to your driving route layer and click “Add Destination”. Then you can select which location you’d like to add to the route by clicking on their icon or name in the toolbar.

Keep in mind that each time you switch between adding a “location” to your map and adding a “driving route”, you will need to click on the appropriate layer in the toolbar. Also, you will want to have your location added to your map and be seen in the toolbar before you add it to your route.
To change the sequence of locations in the route, simply click and drag each location to the appropriate position in the toolbar.

4. Determining Distance Between Locations
You can see the time it takes to get to each location by looking at the “step-by-step directions” in each layer.
Go to the layer of the route you are interested in, and click on the “layer options” icon, which will be three dots. Then click “step-by-step directions”.

At the top in large font, you will see the total distance and time of the entire route. Under each location in smaller, lighter text, you will find the distance and time it will take to get to the next immediate location.

This is useful for determining roughly how long you will be sitting in the car between each location and what time you will be getting there. This isn’t as important to some people, but it was huge for us! It is also convenient for making sure you arrive at each place when they are open for business.
5. Organizing Your Map
Now you know the basics of making your map, but there are still a few more things you can do.
You can organize your map by using layers, color coordinating your location icons, and adding notes.
Adding Layers
To add another layer, click “Add Layer” in the toolbar. Remember that each layer can contain either locations or directions, not both.

Google My Maps lets you have up to 10 layers, so I chose to put all of my locations in one layer, and then added more layers to my map for each day that we would be driving. In our case, we were driving for 7 days, so I had 7 layers of driving routes. That is how I chose to do it, but you could organize it whichever works best for you!
Adding Color
You can change the color of the location markers on your map by clicking the location that you’d like to modify, then the “style” icon. Here, you can select the color you’d like your location marker to be, or associate it with a symbol.
I personally color coordinated each location based on which day of the trip we planned on visiting them (day 1 of the trip: red, day 2 of the trip: orange, etc). This made it easier for me to compartmentalize the map in my mind.


Here is an image of the map I made for my family trip!

Add Notes
To add notes to each location, select a location, then the “edit” symbol.


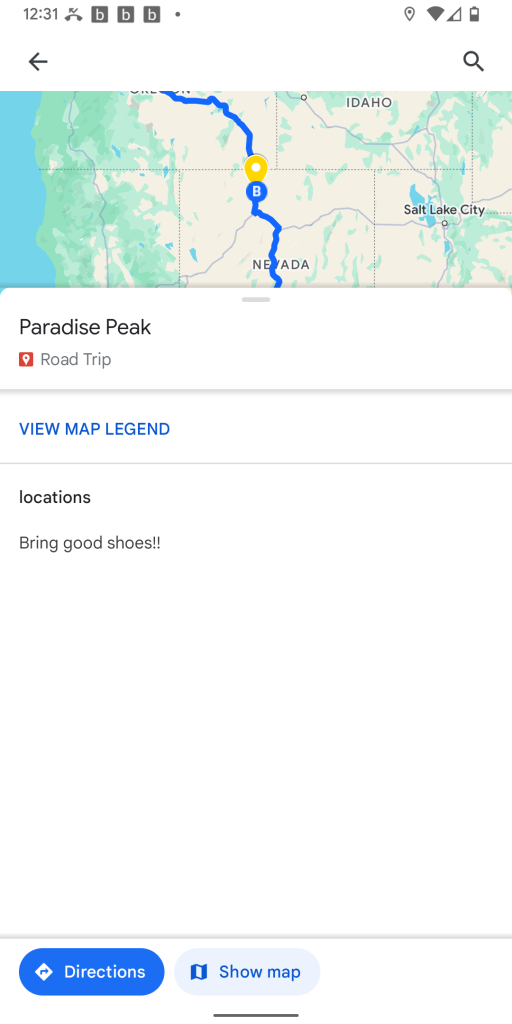
I added notes to each location about what time I expected to get there, how long I wanted to spend there, and how long it would take to get to the next stop. Adding hours of operation and costs of any activities is useful too. These notes will show in Google Maps when you open it for navigation.
Accessing Your Map
Once you have your locations and driving routes added, you can access your map for navigation using your computer or smartphone.
Using your smartphone
To open the map on your phone, you can either access it through your Google Drive, or use your Google Maps application. I will be showing you how to access it through Google Maps.
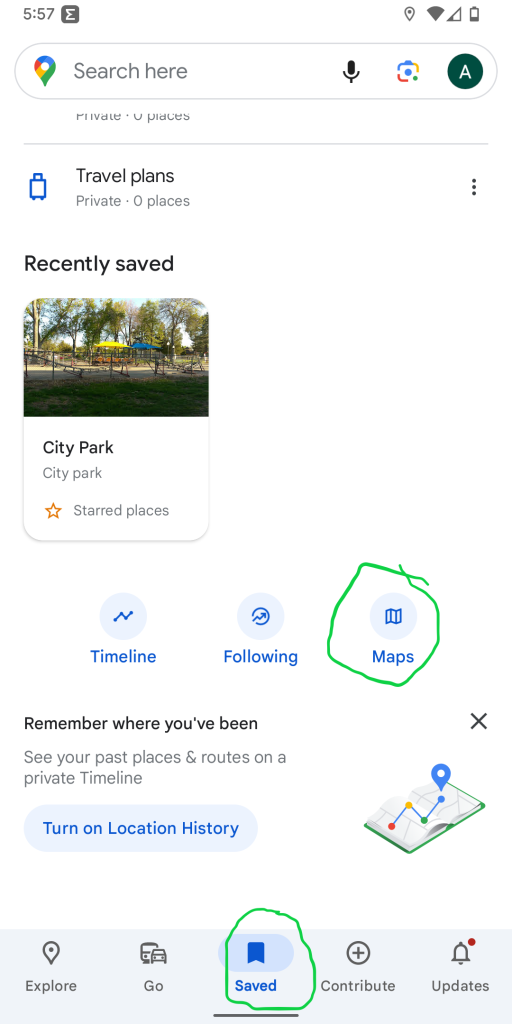
Open google maps. If the account you use for Google Maps is the same as the one associated with your Google Drive, you can simply open the Google Maps App, click on “Saved”, then “Maps”.
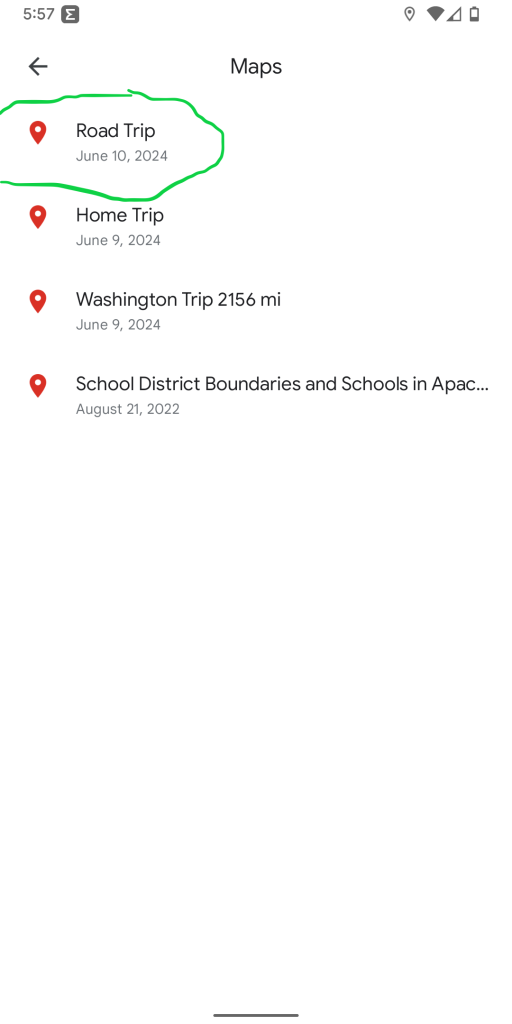
Select your map.
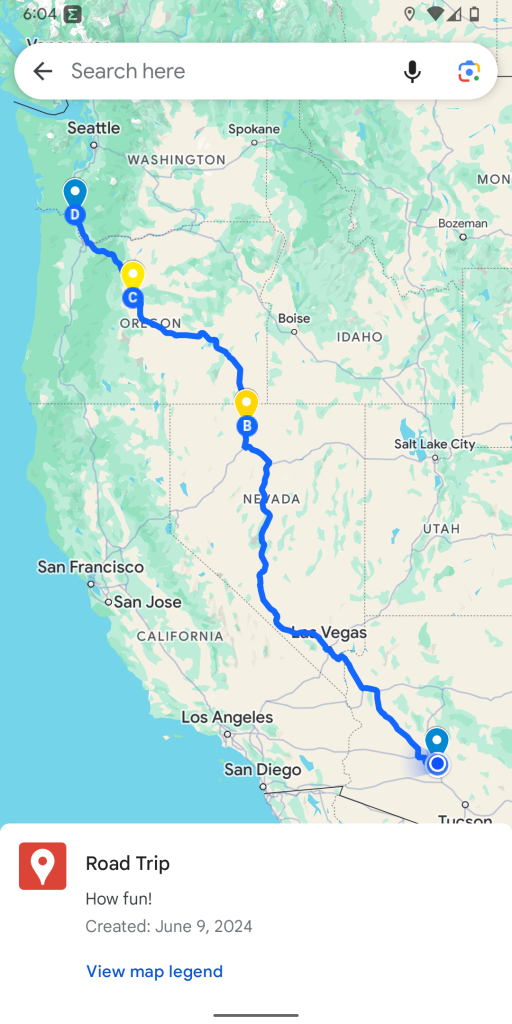
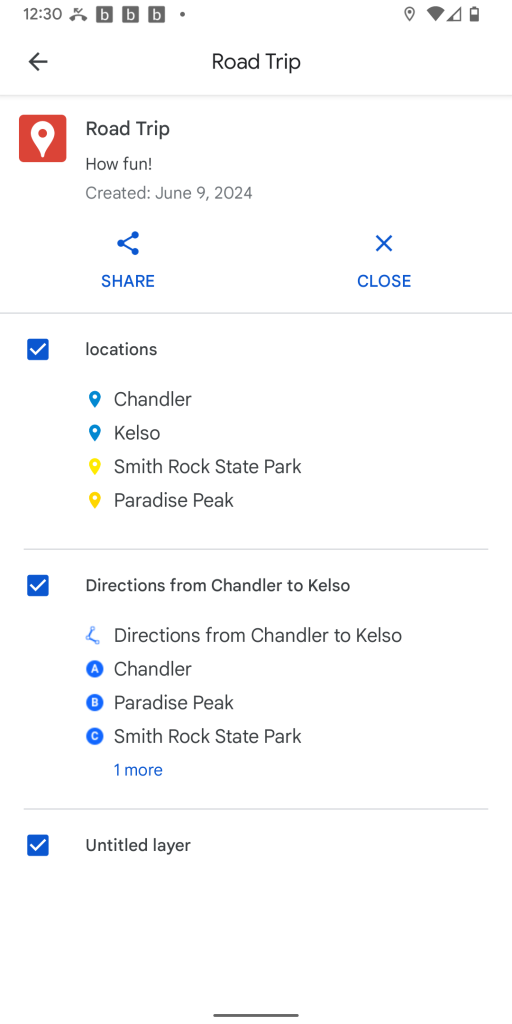
View your map legend. Click on “View map legend” to see all of your locations and routes.
Get your directions. You can click on the location you are planning on driving to, and then “directions”. Any notes you have written will also be show when you click on the location.
Using Your Computer
To open the map on your computer, you can click on the “preview” button in your toolbar.

Your map should open up and show the legend with all of your locations and routes.
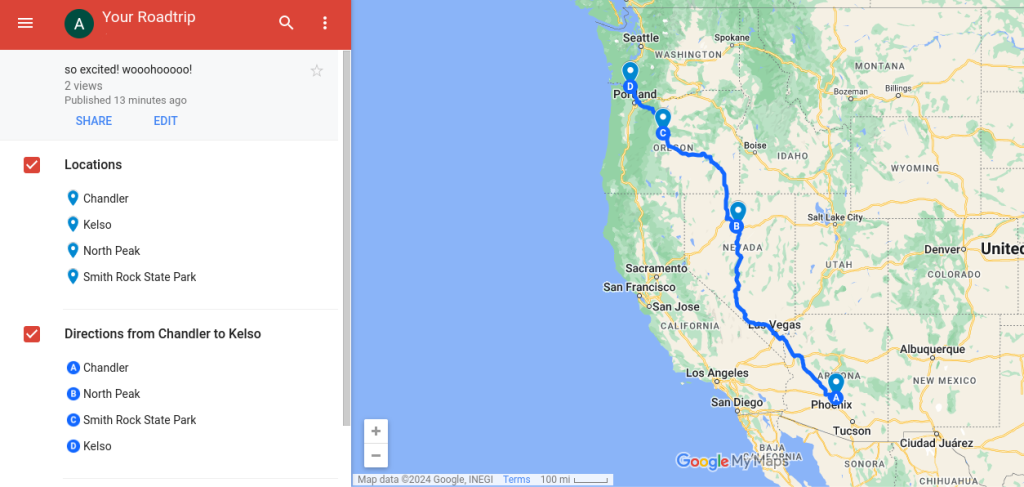
You can then click on the location you would like directions to, then click on the “directions” icon to open directions through google maps.

Have a Good Trip!
Yes, it is a bit of a process, however it was definitely worth it for us! It was nice to find a free road trip planner that does the job. I also liked that it was compatible with the Google Maps app, which we use regularly!
It probably is more time consuming than using a paid app designed for this sort of thing, but if you have the time and are willing to learn, it could actually be really exciting and fun.
If you have a favorite road trip planner, please let me know! I am always open to new methods.
Hope it helps!

Leave a Reply